Changing your default Font

Changing your default Font

This is one of those subjective things. Do you use the default font in text editors or do you switch to a programmer’s font when the option is possible?
For example in Visual Studio, you can select any font you want. The Monotype fonts (i.e. fixed width) are shown bold.

JetBrains, the people behind the Resharper tool for C#, Intellij Idea (the editor used in Android studio) and the Kotlin programming language have given away a new programmers font.

After downloading the font zip file, open it and unzip the multiple versions of the font. There’s 14 variations (extralight, italic etc) and also web versions that you can use in a website. I just took the regular and installed it in Windows. If you Preview the font then you get the option to install it.

In Visual Studio you have to go to Project Options then Font and Colors and select the font. After that you have to close Visual Studio and reopen it.

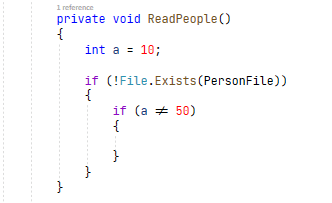
One interesting thing is that this font supports ligatures.  These are special characters that replace things like !=. Here’s what that looks like after installing this font.

Visual Studio Font with ligatures

Of course if you don’t like JetBrains Mono or want to try others programmer’s fonts, here’s an article with eleven listed.

It’s not just Visual Studio that this works with, you can change the font in Visual Studio Code and others.

Interesting C Program- What do you think it does?

Interesting C Program- What do you think it does?

Question mark
Image by Gordon Johnson from Pixabay

This is a past IOCCC winner. It needs a #include <stdio.h> to compile.

#define _ -F<00||--F-OO--;
int F=00,OO=00;main(){F_OO();printf("%1.3f\n",4.*-F/OO/OO);}F_OO()
{
            _-_-_-_
       _-_-_-_-_-_-_-_-_
    _-_-_-_-_-_-_-_-_-_-_-_
  _-_-_-_-_-_-_-_-_-_-_-_-_-_
 _-_-_-_-_-_-_-_-_-_-_-_-_-_-_
 _-_-_-_-_-_-_-_-_-_-_-_-_-_-_
_-_-_-_-_-_-_-_-_-_-_-_-_-_-_-_
_-_-_-_-_-_-_-_-_-_-_-_-_-_-_-_
_-_-_-_-_-_-_-_-_-_-_-_-_-_-_-_
_-_-_-_-_-_-_-_-_-_-_-_-_-_-_-_
 _-_-_-_-_-_-_-_-_-_-_-_-_-_-_
 _-_-_-_-_-_-_-_-_-_-_-_-_-_-_
  _-_-_-_-_-_-_-_-_-_-_-_-_-_
    _-_-_-_-_-_-_-_-_-_-_-_
        _-_-_-_-_-_-_-_
            _-_-_-_
}

When I compiled and ran it in Visual Studio it output 0.25 which is not the value it’s intended to output. That said it also messed up the formatting.

I can’t recommend this formatting BTW but then that’s the idea, to obfuscate i.e. disguise its purpose! So have you figured it out yet? I put the image on the right so as not to break up the program listing…

Monetising a game

Monetising a game

bright city lightsThe celebrity game I’m building and I’ve been describing is free to play but servers cost money, so how does it make money?

First you have to understand there are two types of game currency. (Glitz dollars and Glitz Stars). Dollars are used in-game. It’s what your character needs to earn to survive, make rent etc.

Stars are worth about 10p or equivalent and can be bought and are spent on things like Chance Bags and character auctions. (See below)

So here are a few ways I’ve thought of.

  1. The mobile apps are free but will carry Ad-mob type adverts.
  2. Chance Bags. You can buy a set of cards that can be played to have Lady Luck affect you or mainly other players such as friends. These will be cost something like 10 Stars an provide 3-5 cards. The idea is to prevent players playing to win.
  3. Character Auctions. If a player has got a high-celebrity character then they can get something back by auctioning it in the in-game auction and they get 90% of the auction price. Celebrities drop a rank when they are sold by auction (they are advertised at the lower rank) and lose all accumulated properties (but the buyer does get some benefits).
  4. Sponsorship. Anyone can sponsor and this provides in-game gifts related to the sponsor and carrying their messages, logo and a link to a website. Plugging a new album? Gift it (in game ) to musicians by sponsoring. Also sponsors can sponsors major events, festivals etc in-game, Gifts can be given at film pre-launch parties to attendees etc.
  5. Watch a video and earn in-game Glitz dollars.
  6. Pay for advertising in-game. Players can do this. A phase two development is to allow celebs to buy in-game businesses such as Bands, film production, Bars, Hotels etc. That needs carefully thought though.
  7. Buy in-game gifts for other players.
  8. GlitzVille. This is the in-game magazine. This is produced by an editor who receives a tap  of news generated in-game and can pick and choose what to write about. It’s a modest cost per issue, only a few Glitz stars and the editor receives 75%.

As with all battle plans, this will change as the game grows and I may scrap some or come up with new ideas.


How to calculate how effective a Riffle is

How to calculate how effective a Riffle is

deck of cards
Image by Hebi B. from Pixabay

In my previous post I mentioned about writing a program to determine how effective a riffle shuffle was. So here’s the code.

How it works

I’m using an array of 52 chars to hold the deck. I’m only interested in the card’s position in the deck so each card is initialised with a value in the range 0-51. I’m using three other similar sized arrays.

  • tempCards are used purely for doing the riffle.
  • distances are used to calculate the maximum distance the card moved
  • startPos tracks the cards starting position 0-51 before doing lots of rounds of riffles.

The program starts by picking up ( as a parameter) how many rounds you want it to run. It defaults to 10 if no value is input.

It then clears distances and inits cards. In each round, it starts by storing card positions in startPos. It then does seven riffles and works out how far a card has moved. If it has moved more than before (in distances) it stores it in distances.

DoRiffle works by indexing through the two 1/2 deck piles taking a card from each and a 50:50 random chance determines which of the two cards goes into the shuffled deck first and then second.

Here’s the listing.

// riffle.c by D. Bolton (C) 2020 Learncgames.com - TYou are free to redistribute but please keep this line in

#include <math.h>
#include <stdio.h>
#include <stdlib.h>
#include <string.h>
#include <time.h>

// #defines
#define MAXROUNDS 10
#define NUMRIFFLES 7
#define NUMCARDS 52

// variables
int NumRounds;
char cards[NUMCARDS],tempCards[NUMCARDS],startPos[NUMCARDS];
int distances[NUMCARDS];
time_t t;

// functions

// Convert string to int calling strtol
int GetIntArg(char* str) {
	char* ptr;
	return strtol(str, &ptr, 10);
}

// Merges two cards a and b. 50:50 chance that a above b or other way
void DoRiffle() {
	// Copy cards into tempCards
	memcpy(tempCards, cards, sizeof(cards));
	// Merge each pair of cards tempCards[i] and TempCards[i+26]
	int cardIndex = 0;
	for (int i = 0; i < NUMCARDS / 2; i++) {
		if (rand() % 2) {
			cards[cardIndex++] = tempCards[i];
			cards[cardIndex++] = tempCards[i + 26];

		}
		else {
			cards[cardIndex++] = tempCards[i + 26];
			cards[cardIndex++] = tempCards[i];
		}
	}
}

// Works out how far cards have moved, added to distances
void CalculateDistances() {
	for (int i = 0; i < NUMCARDS; i++) {
		int moved = abs(cards[i] - startPos[i]);
		if (moved > distances[i])
			distances[i] = moved;
	}
}

void DoShuffles() {
	// Clear distances and init cards
	for (char i = 0; i < NUMCARDS; i++) {
		distances[i] = 0;		
		cards[i] = i;
	}
    // do Numrounds  rounds
	for (int round =0;round<NumRounds;round++){
		// Mark where the card starts
		for (char i = 0; i < NUMCARDS; i++) {
			startPos[i] = cards[i];
		}
		// Do seven riffles
		for (int i = 0; i < NUMRIFFLES; i++) {
			DoRiffle();
		}		
		CalculateDistances();
	}
	int furthest = 0;
	for (int i = 0; i < NUMCARDS; i++) {
		printf("Distance[%d]=%d\n", i, distances[i]);
		if (distances[i]> furthest) {
			furthest = distances[i];
		}
	}
	printf("furthest moved is %d\n", furthest);
}


int main(int argc, char* argv[]) {
	srand((unsigned)time(&t));
	if (argc ==1 || argc== 2) {
		NumRounds = MAXROUNDS;
		if (argc == 2) {
			NumRounds = GetIntArg(argv[1]);
			printf("Numrounds = %d\n", NumRounds);
		}
		DoShuffles();
	}
	else {
		printf("Please supply 0 or 1 arguments e.g. riffle 60\n");
	}
}

Even with ten rounds I’ve seen cards move 51 positions. With 5,000 rounds all cards but one moved by 51 and one by 50.

How many riffles are needed to shuffle a deck?

How many riffles are needed to shuffle a deck?

card riffle photoIt fascinates me because 52! is such a large number.  Here it is in full 8.0658* 10^67 or 80,658,175,170,943,878,571,660, 636,856,403,766,975,289,505,440,883, 277,824,000,000,000,000. That is the possible number of ways of shuffling a pack of cards.

It means that when you shuffle a deck of cards, it’s possible that you are the first person on Earth to ever get that particular arrangement. It’s the kind of fact that amazes me. Another one is that it takes a very long time for particles emitted from the centre of the sun to reach the surface and blast into space. On the order of many many years. (Thousands of years!)

Playing cards have only been around maybe 500 years as we know it (52 card deck) though date back to 9th century China for their invention. If there had been a billion shuffles each day during that 500 years, that’s only 1.8 x 10^14 shuffles. That is a minuscule fraction of the possible number of arrangements so the chances are that any shuffled arrangement is new is pretty high.

It’s accepted that seven is the number of riffles needed to perfectly shuffle a pack of cards. A riffle is where you split the deck in two and then merge the two halves back into one deck as in the photo I took.

I proved this once by writing a program to simulate riffles  and looking how far cards have moved after seven. In fact a card at the top of the deck moved to the bottom after only six riffles. I’ll try and write that in C and will publish it here in a day or two.

Other shuffling techniques like smooshing (spreading out all the cards on the table with their backs face up and then pushing them together) are nowhere near as efficient. It’s estimated it can take thousands of smooshes to properly shuffle a pack. It’s not easy to simulate, though one of these days I’ll have a go and see if I can come up with a more accurate estimation.

How to install SDL2 in Visual Studio

How to install SDL2 in Visual Studio

Visual Studio IDEThis is the first of a number of longer-piece game related tutorials. You’ll see I’ve added a tutorials link to the top menu. That page will grow as I add tutorials, as each is added to it .

You’ll see I use the terms SDL and SDL2 mostly interchangeably. SDL is the name of the library but we don’t want the older SDL1 instead we want SDL2 which seems more or less permanently at version 2.0.12.

I’ve left the Visual Studio version off as the process is mostly the same whether it’s Visual Studio 2017, 2019 or future versions. Screenshots are from Visual Studio 2019.

You don’t have to do this on Linux as it takes three or four sudo apt installs to add the various SDL2 dev modules in, but with Windows you need to configure Visual Studio and it can be a somewhat confusing process if you are new to Visual Studio.

Also you need to download and fetch the various files. This is made slightly more complicated because there are 32-bit and 64-bit versions and you want to keep them both so you can switch between the two.

Here are the various steps we have to go through.

  1. Download the various files and unzip them
  2. Setup include and lib paths in Visual Studio
  3. Add the lib files into Visual Studio.
  4. Copy the dlls into the folder where the game will run.
  5. Compile and run it.

What you are downloading are basically three types of files.

  1. Header files., This is files like sdl.h.  Your program will #include these.
  2. Lib files. This is the bulk of the SDL code.
  3. Dll files (Dynamic Link Liobraries). Needed for runtime.

Download the various files and unzip them

The SDL website is libsdl.org and if you click the SDL Releases in the bottom right it will take you to the SDL downloads page. WE don’t need the source code (you are welcome to download it and take a look but it’s not needed to use SDL2.

We do however need the development libraries. These include the runtime binaries so we don’t need to download those. as well. Just the one file SDL2-devel-2.0.12-VC.zip

I suggest you create a folder SDL or SDL2 on your drive. My C: drive is for Windows so I use d: \SDL2

If you unzip the files into there you’ll end up with three folders and five .txt files. Just under 7 MB in total. Other than docs there are include and lib.  The lib folder is further split into x64 (64-bit) and x86 (32-bit) . It also includes the runtime dlls. These will have to be in the path for your program but we’ll leave that until later.

Sounds, Images and Truetype fonts

As well as these, you are probably going to want image file support, sounds and possibly truetype font support in your program. These are separate files in the SDL projects folder.

  1. Image file support. Download the development library file from the sdl_image page. As before you want development library file. SDL2_image-devel-2.0.5-VC.zip.
  2. Sounds file support. Download the development library from the sdl mixer page. It’s SDL2_mixer-devel-2.0.4-VC.zip.
  3. ttf file support. Once again a development library downloaded from the SDL_ttf project page. It’s SDL2_ttf-devel-2.0.15-VC.zip.

All three files have similar structure to the SDL2 dev library.  Unzip the include files into the SDL include folder and the lib files into the relevant X86 and X64 lib sub-folders. So all your SDL files that you need are in the same include and lib sub-folders.

I suggest you extract the file folders one by one, do the three include files first then the x64 files and then the x86. Do not get x86 and x64 mixed up. The only way to tell them apart is by size and it’s not always an accurate way.  Don’t worry if it complains about overwriting zlib1.dll. There’s a copy in both the images and sounds zip files.

Setup include and lib paths in Visual Studio

This can be a bit complicated, just follow these instructions exactly.

To configure a C/C++ project in Visual Studio, you have to specify where the compiler gets its include files, where it finds its lib files and which lib files you want to link to.

Solution ExplorerI’ve created a blank C++ project called sdltest in VS 2019.  Now I actually want it to be a C project so just rename the main file sdltest.cpp to sdltest.c. You need to delete all of the C++ code in that file as well.  After renaming the Solution Explorer should look something like this. We will have a sdltest program to run later so just save this for now. You can get the file from GitHub and overwrite sdltest.c.

Now click Project on the top menu then sdltest properties at the foot of the menu.  You should see this form (below).  This is how you specify properties for your project in Visual Studio.

You’ll see I have selected VC++ Directories on the left. This is where you specify some of the directories (folders and directories mean the same thing BTW) .

But the Platforms pull down probably shows Win32 on yours. Change it to All Platforms. Visual Studio lets you specify configurations for all things or for x86 or x64 separately. We’ll use the same include folders for both x86 and x64 but we’ll specify the paths to the lib files individually as the x64 lib files are in the x64 sub-folder and the x86 files in the x86 folder.

Property Pages
To specify the path click on Include Directories, you’ll see a down arrow appear on the right.  Click it and you’ll see <Edit…> appear, click it and a form like this below will popup.
Visual studio folder editClick on the blue area in the form and you’ll be able to paste or type in the path or click the … button to get a file browser appear. Type in, paste or select the folder then press Ok.  You should now see your path in the folders.

Here I typed in d:\SDL\Include. Be careful that you don’t get rid of $(VC_includePath);$(WindowsSDK_IncludePath); in the include path as I did as your program won’t compile!

folder paths

We now have to do the same for the lib paths.  But first we must change the Platform to specify x86 or x64.

If you change it, a popup will appear asking if you want to save your changes. Click the Yes button.

Confusingly the platform choices on mine are Win32 and x64, but Win32 is the same as x86.

You’ll see that the include path you added shows up in the x86/Win32 platforms because we changed it for all platforms.

Now add the path for Library Directories. Click the down arrow then <edit…> and put in the full path to the folder that matches the Platform. x86 for Win32 platform, x64 for x64 platform. After you’ve entered it will show up in the directories.

Visual studio all paths

If you want both x64 and x86 then change the platform and re-enter it. Don’t forget to save!

Add the lib files into Visual Studio

The last configuration to do is specify the lib files that are needed. We’ve specified the paths for include and lib files but the compiler linker doesn’t know what lib files to link.

As linking depends on 32-bit or 64-bit we have to specify this twice as we did for the lib paths. It’s in a different place in the property pages. Click Linker then Input.

Visual Studio Linker Configuration It’s the top line (Additional Dependencies) that we need to work with. Click into it to get the down arrow then click that and the <edit…> as before.

You’ll have noticed that it comes pre-populated with all the various library .lib files.  We’ll be adding some more. The ones we need are

SDl2.lib SDL2_mixer.lib SDL2_ttf.lib SDL2_image.lib and SDL2main.lib

Add these into the edit box one by one and press return after each one.

After you’ve added them and pressed Ok, you’ll see them in a list. Something like this though I’ve not added SDL2_ttf.lib in to it yet.

As before repeat for both x86 and x64.


We’re now ready to compile. Only we need a program to do that. I’m not going to list the whole sdltest as it’s 135 lines but you can download the VS project in the file sdltest.zip from GitHub. It should compile with no errors. If you get errors, please recheck the include folders and lib folders and make sure you have configured them correctly.

So it compiles, but it won’t run. If you look in the Debug folder under the x64 (or Win32 if you built that) , you’ll see a whole lot of files. but only sdltest.exe is important. You can delete the rest. Leave sdltest.pdb if you wish to debug.

We have to

Copy the dlls into the folder where the game will run

That folder is this the \sdltest\x64\Debug folder. We need several .dll files from the same lib folder that holds the x64 libs. (Again if you are on Win32 you need dlls from the x86 lib folder).

What files do we need?

Just SDL2.dll. If we were using images we’d also need sdl2_image.dll and zlib1.dll. We don’t currently need the SDL2_mixer.dll or the SDL2_ttf.dll but if you ever use sounds or Truetype then you’ll need those. For sounds you’ll also need some of the lib*.dll files such as libogg-0.dll or libvorbis-0.dll. For image we might need in the future libjpeg-9.dll (if we ever use jpg files).

So you’ve compiled it and should see something like this when you run sdltest.exe. It doesn’t do much except draw coloured rectangles. Press the esc key to close it. On my POC it draws 100,000 coloured rectangles each 120 x 120 pixels in about a second. That’s pretty fast!

The heart of the program is this function:

void DrawRandomRectangle() {
	char buff[20];
	SDL_Rect rect;
	SDL_SetRenderDrawColor(renderer, Random(256) - 1, Random(256) - 1, Random(256) - 1, 255);
	rect.h = 120;// Random(100) + 20;
	rect.w = 120;// Random(100) + 20;
	rect.y = Random(HEIGHT - rect.h - 1);
	rect.x = Random(WIDTH - rect.w - 1);
	SDL_RenderFillRect(renderer, &rect);

	rectCount++;
	if (rectCount % 100000 == 0) {
		SDL_RenderPresent(renderer);
		stopTimer(&s);
		sprintf_s(buff, sizeof(buff), "%10.6f", getElapsedTime(&s));
		SetCaption(buff);
		startTimer(&s);
	}
}

Uncomment the two lines with 120; // Random(100) + 20; to have it draw random sized rectangles. The figure in the caption is how long it takes to draw 100,000 rectangles.

Trying to go schemaless

Trying to go schemaless

3.5" Floppy disks
Image by PublicDomainPictures from Pixabay

In my post SQL or NoSQL two days ago, I was dancing around the problem which is I am trying to avoid using a schema for the game’s database tables. NoSQL allows this, whereas a relational database of fixed schema tables (SQL) s more restrictive.

One reason for this is to make it easy to add new features without having to run an upgrade every time I want to add say a column in a table. I’m moving towards some key of key-value store.  This is not a real-time game but a more traditional data-processing engine which reads in a lot of data then process it and then writes out the altered data.

The data quantities are not really that big, a maximum of 10,000 players in one game using 10 KB each so maybe 100 MB of data so it could all be managed say by storing the data in JSON files rather than a database.

In the past I might have used a SQL database and I have used SQLite in a desktop application. It is fast, but if I can hold everything in RAM it will be faster still.  JSON does bulk up data a bit but nothing like as bad as XML which can be five-six times bigger.

Back when I programmed something comparable to this in 1989-1990, these (in the picture) were the standard media. Hard disks had not been around long and were quite expensive! These could hold a whopping 1.44 MB each.. CDs for data did n’t even exist then.


The fun of game design

The fun of game design

Audience
Image by Pexels from Pixabay

My new side project is a free to play multi-player mobile game about living the life of a celebrity. It’s brutally competitive and will accommodate up to 10,000 players in one game. It scales horizontally so multiple games can be run at the same time. It’s an idea I’ve had for years and now I’m on it.

The idea is that you start moving to the big city. A city where your dreams can come true by becoming famous in some field. Whether breaking into film,  or sport, on TV, a famous writer and so on.  But first as a wannabe, you have to get a job, whether its pumping gas, waiting on or one of a dozen jobs.  And try to make your way up the greasy pole to the top of the A-List.

I have devised mechanisms for this. But there’s way more depth to the game than what I’ve said. The game is basically about decision making. Every action has consequences. If you go to this party, you might make friends with someone who can open doors that will give you more public exposure and earn celebrity points.

The game server generates events that you can attend. It’s a busy life attending openings, first nights, filming of videos, commercials, going to auditions, making guest appearances, signing books, partying, going to concerts, balls, awards ceremonies, opening fayres, launching ships, or more mundane things like product launches, endorsements, appearing in TV adverts and more.

All this has to take place in a game city. So the game server has to create a city populated with buildings, with jobs. Celebrities actually do jobs. Those books don’t write themself, or films make themself. Musicians have to record songs, go on tours. But you are also interacting with other players, helping them and helping yourself.

As a game designer and programmer I have to translate all this into code. In the past I programmed postal games. These were games where orders were sent by post, processed, results printed out and then mailed back. In this case, they’re entered on mobile and uploaded to a game server. Here a program will run at regular intervals and process a day’s activities. All those parties etc. have to be processed and the consequences determined. Did you make friends, did you get any new job offers? Have you accumulated some more celebrity points and moved up in the league table? Did you escape from being a wannabe to C-lister yet?

Then after that’s all done, the results and new decisions can be fetched onto mobiles and players decide what their next decisions will be…  That’s what I’m designing and programming. Both the game server engine and the mobile clients.

Completely off-topic but how to tether an iPhone to Windows 10

Completely off-topic but how to tether an iPhone to Windows 10

A PC tethered by two phonesThanks to an apparent hardware failure in my internet modem (power light remains stubbornly off), I found myself without internet except on my iPhone which has 20 GB of 4G data allowance.

Normally in a month I use less that 0.25 GB of the 20 GB $G monthly allowance data because of fast WiFi at home and at work but I do use it for phones and messages.  It’s convenient on rare occasions when I’m out though to have internet access ability on a phone.

Unfortunately for reasons best known to Microsoft or Apple or both, iPhones no longer seem to tether with Windows 10.  They did for Windows 7 and it’s a real PITA.

But there is a way to manage it. Just use an Android phone as well. If the Android phone had mobile data then no problem but even if it doesn’t, it can tether to my iPhone over WiFi. And my PC can tether to the Android phone using a USB cable and that is how this is being brought to you.