Category: Tools

How to create a Controller Map on Raspberry Pi

How to create a Controller Map on Raspberry Pi

Game Controller map screenshotI’ve been working on my 2nd eBook and adding a GamePad is a thing I need to explain. You can see them in earlier blog posts:

  1. Fun with gamepads.
  2. More on Raspberry Pi Gamepads.

But I want readers of the book to be able to generate their own controller maps. I cannot assume that everyone has access to Windows.

What I didn’t know back then is that SDL comes with a game controller map generator application called (subtle this!) controllermap that you can run on your Pi or Linux computer.


I had to use the File Manager Find file facility to locate it. It’s in the installed-tests folder for SDL2 or more precisely /usr/lib/aarch64-linux-gnu/installed-tests/SDL2 on my Raspberry Pi running 64-bit Raspberry Pi OS.

On my VM Ubuntu I found it in /usr/lib/x86-64-linux-gnu/installed-tests/SDL2

I did a bit of experimenting with a clean Raspberry Pi OS setup and then I installed libsdl2-dev and saw the installed-tests/SDL2 folder installed, so that’s what you need. So install the dev files as per New tutorial on installing SDL on Linux.

Plug in a gamepad and on your Pi, cd into that folder (the Pi one not the Ubuntu one!)  and in a terminal run ./controllermap

USB Joypad

It will open with your B button highlighted. Press your B button. In the picture above it’s the circle on the right hand side that is the lowest of the four or the yellow button in this picture of my controller.

It will then go through every possible button.  Just press the corresponding button or space key if you haven’t got that. Compared to the main picture, mine lacks the two bottom joysticks, the buttons between the Stop and Start buttons and the two trigger buttons at the top. For each of those just press the space bar.  Eventually it will loop back to the B button. Just press it and it will finish and output the gamepad control map.

It outputs two copies of this. You can send one to a text file in your home folder by doing

./controllermap >~/gamepad.txt 

but you will have to press all the buttons etc. again. This is what my Pi gave.

030000001008000001e5000010010000,usb gamepad,platform:Linux,a:b2,b:b1,x:b3,y:b0,back:b8,start:b9,leftshoulder:b4,rightshoulder:b5,leftx:a0,lefty:a1,

And that is what you use in SDL2 code.


Updated, how I track designs

Updated, how I track designs

Dendron logoBack in August I mentioned WikidPad which I had been using for ideas, design notes etc.

Recently though while waiting to get my Windows PC sorted, I’ve been doing nearly everything on an old laptop that I’ve repurposed by installing Ubuntu. All blogs since March 6th have been done on this laptop.

Today I came across Dendron which is a markdown editor (on steroids!) that runs in VS Code. Anyone who reads this blog knows that I’m a big fan of VS Code so it’s a no-brainer to combine the two.

Markdown is a way of annotating text for example *this phrase* will appear in italics. Dendron lets your have a split view so you type in the markdown text on the left and the page appears on the right.

The idea is that you create your document out of lots of pages, that are hyper linked. Dendron makes it easy to create pages and link them. Markdown is used to add formatting. WikidPad used a similar scheme but it was a Windows application holding pages in a SQLite database not an extension to VS Code as Dendron is that holds pages as individual text files.

Dendron appears a lot more powerful so I will be getting to grips with it. It’s a handy way of designing and documenting a design.


Compiling and linking C

Compiling and linking C

Code
Image by fancycrave1 from Pixabay

So, if you are new to programming Compiling and linking can seem like magic. The compiler transforms C source code files into obj files. The actual format is different depending on the CPU and Operating system.  Linking is even more magic because it takes a bunch of obj files and produces a single executable.

There’s actual more magic going on than my simplistic explanation. The compiler might be doing optimisation (generally in release mode but not debug). That makes debug compiles faster which is more desirable.

Another blog called Hack the developer has published an article with a lot more detail about compiling and linking. If you want to get a better understanding then this is a petty good piece. It uses Linux, GCC and Clang as examples. It also goes into more depth on the layout of obj files.

How to install WSL 2 and Linux on Windows 10

How to install WSL 2 and Linux on Windows 10

Winver commandThis assumes that you have the version 2004 of Windows 10. Run the command Winver (open a command line then type winver) to see what version you have.

WSL is Windows Subsystem for Linux and lets you run one of several Linuxes (after installing) in Windows. For now it is terminal only but you can debug programs using Visual Studio. WSL 2 is the current version of WSL though you can run the older WSL 1.

Your computer also needs to support Hyper-V Virtualization to run WSL 2. If it doesn’t you can run WSL 1.

Steps.

  1. Open a PowerShell windows in Admin mode. My way of doing this is open the search window and type Powershell. Then right-click run as Admin.


When I mean Search Window, I mean the one on the Toolbar that looks like this like a magnifying glass: (highlighted in the red square)

Search Window


2. In the Powershell Windows, copy and paste this command:

dism.exe /online /enable-feature /featurename:Microsoft-Windows-Subsystem-Linux /all /norestart

3. Next run this command in the same Windows:

dism.exe /online /enable-feature /featurename:VirtualMachinePlatform /all /norestart

4. Set WSL 2 as default with this Powershell command:

wsl --set-default-version 2

Now close the Powershell Window and in the search box type Store. You should see Microsoft Store.  It’s an app on your PC. Click it to run it and type in Linux in the search box. Click Show all and you should see something like this. Pick one like Ubuntu, Debian etc.  Apart from the ones with a price against them, the rest are free. Cl;ick Get and it will install.

Linux in Microsoft Store

After it has installed, you can run it from your Start Menu. I dragged it onto the square so I have a nice clickable icon.

Windows Start MenuJust click it and your Ubuntu (or whatever) Linux will open at a terminal prompt like this.

Ubuntu Terminal


How I track ideas

How I track ideas

About twelve years ago I came across WOAS (= Wiki on a Stick). It was a single HTML file notebook with built in JavaScript and you opened it in a browser. It showed a simple interface and you could switch it into edit mode and start adding in text in markdown format. It was very easy to create links to pages in the document and add new pages.

And it was all saved in the document. Also very easy to find the text. It had one excellent feature which I miss, You could have a page self-encrypt using AES-256. Great for holding passwords etc.

I used WOAS to deign software and had at least one very detailed design with several hundred pages each with links to other pages. Sadly WOAS was eventually killed by the browsers themselves, preventing files writing to disk. It’s not the only example of a single-file Wiki but they all suffered the same problem. I think someone came up with a Java shim that did the file writing but it was never the same.

Now I use WikidPad, it’s written in Python and I think just runbs on Windows, (though you wouldn’t know it) which works like WOAS but internally it uses SQLite to hold the Wiki pages.  You can even use their website WikidPad but you have to register first.  That picture is a screenshot of WikidPad.

A graphics editor in C

A graphics editor in C

Screenshot of grafX2 As the picture shows, no one has ever accused me of being artistic! Hey I can’t be good at everything (sometimes it feels like anything but it passes!) and I’ve long ago accepted that I never will be an artist.

But I can get by with graphics as I hope all the pictures on this site show. Either they are screenshots or comes from sites like pixabay.com and unsplash.com. Both are excellent sources of free images.

Sometimes though I have to do a lot of editing. MonoGame requires bitmaps for fonts. So I’ll take a free monospaced font and choose a size and create a sprite sheet from it.

But sometimes the tools I use are less than perfect. I never mastered or bought PhotoShop. Instead I used software like PhotoDraw 2 (from Microsoft in the early 2000s) or before that Macromedia Fireworks. But these are quite old and instead I’ve been looking around for something a bit newer.

There are quite a few open source graphics editors and if you look closely at my er artwork you can see at the bottom that this was taken from one such package called GrafX2. One reason for including it is that it’s coded in C and it reminds me of the granddaddy of drawing packages : Dpaint. As we’re talking over 30 years ago, I don’t know how many will remember it.

Hex Editor for Raspberry-Pi

Hex Editor for Raspberry-Pi

Hex Editor Raspberry PiSometimes you just need to view or maybe a binary file and here I’ve done that on the compiled file for asteroids.

I can’t recommend doing that, but I wanted to try hexedit on the Raspberry Pi. I ran it against the asteroids compiled program and found the text.

If you look I’ve changed the d in starfield (first line of text) to an e. Then I saved it. The program, not unreasonably crashed when run with an error in the errolog.txt file: Couldn’t open images/starfiele.png

You install hexedit with

sudo apt install hexedit

and run with the file you want to view/edit.

hexedit asteroids

To view all the command press F1. It displays the man page for hexedit. Have fun!

Binary editors – Useful tools

Binary editors – Useful tools

HxD - Binary editorAt some time or other you are going to need a binary editor, to let you look in files and see what they contain.

One I can recommend is HxD which is shown here.

This not only lets you look at the contents of a binary file (in hex and decoded as text)  but you can change them.

It also includes file tools so you can split files, combine them (i.e. append) and securely wipe them. And very handy, the ability to compare two binary files, shown below.

It also lets you export binary files as data  for any of these languages (Pascal,C C#, Java, VisualBasic.net, HTML, rich text and some other formats). Here’s what the top file looks like exported into C.

/* D:\development\pivot\pivot\Debug\l.key (11/05/2020 12:03:32)
StartOffset(h): 00000000, EndOffset(h): 0000003F, Length(h): 00000040 */

unsigned char rawData[64] = {
0x18, 0x3C, 0x2B, 0x11, 0x24, 0x1E, 0x17, 0x26, 0x1C, 0x15, 0x04, 0x19,
0x23, 0x28, 0x08, 0x07, 0x35, 0x0F, 0x34, 0x37, 0x32, 0x05, 0x20, 0x27,
0x3E, 0x0A, 0x3B, 0x2E, 0x1F, 0x29, 0x21, 0x25, 0x2F, 0x14, 0x2D, 0x1A,
0x1D, 0x0C, 0x33, 0x01, 0x39, 0x2A, 0x1B, 0x00, 0x36, 0x06, 0x22, 0x31,
0x38, 0x3A, 0x3D, 0x2C, 0x16, 0x0D, 0x03, 0x00, 0x09, 0x12, 0x13, 0x02,
0x0B, 0x0E, 0x30, 0x10
};

In truth there are many binary file editors. You can find them under hex editors as well. But this is a particularly nice one; recommended.
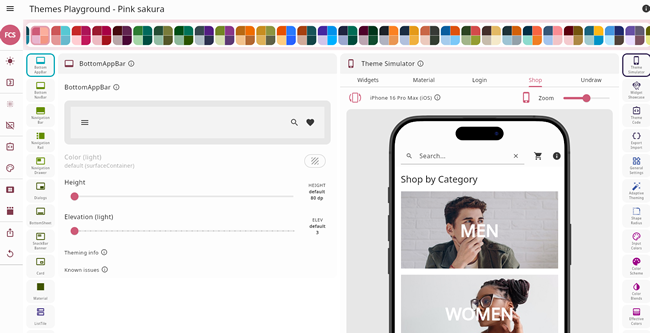
New version of Visual Studio Code

New version of Visual Studio Code

Update to Visual Studio codeNormally I wouldn’t mention it, as there’s nothing really outstanding about the update (accessibility improvements, Timeline view, Better quick open for files etc.) You can read all about it here.

But the online documentation has improved and more importantly there’s a new tutorial using C++ on Linux. I could have done with this a few weeks back; everything there I had to figure out for myself! In our case I’ve used clang not gcc and C not C++ but those are very minor differences.

But it does have better explanations for many of the fields in the various .json files. Also the changes to tasks.json to allow multiple files. I just added them in based on gcc.


Install Clang and Visual Studio Code on Ubuntu

Install Clang and Visual Studio Code on Ubuntu

Visual Studio CodeClang is very easy to install. Open a terminal and issue this command:

sudo apt install clang

It takes a little bit more for Visual Studio Code (aka VS Code). Start on the download page of VS Code. Just google for download Visual Studio Code or click here. Click the Deb rectangle and pick the Open with Software install (default) and that will install it.

After that is installed, run VS Code (open a terminal and type code) and click the extensions icon (5th down on the left) and type in C++ in the search box. The first result is by Microsoft so select it and click install.

Now I created a Projects folder under my home, so click on open Folder in the File menu and select Projects. You can create individual folders for applications under that. If you look closely you can see Asteroids, AsteroidsDND and Examples with Asteroids being open and containing two .c files.

To compile, make sure the open tab is the file you wish to compile then click Terminal on the top menu and Run Build Task…  You’ll see the compiled programs on the left under the Asteroids folder (decnot and ex1).

There’s a bit more for configuring Builds and Debugging but I’ll cover that another time.