Category: utility

How to create a Controller Map on Raspberry Pi

How to create a Controller Map on Raspberry Pi

Game Controller map screenshotI’ve been working on my 2nd eBook and adding a GamePad is a thing I need to explain. You can see them in earlier blog posts:

  1. Fun with gamepads.
  2. More on Raspberry Pi Gamepads.

But I want readers of the book to be able to generate their own controller maps. I cannot assume that everyone has access to Windows.

What I didn’t know back then is that SDL comes with a game controller map generator application called (subtle this!) controllermap that you can run on your Pi or Linux computer.


I had to use the File Manager Find file facility to locate it. It’s in the installed-tests folder for SDL2 or more precisely /usr/lib/aarch64-linux-gnu/installed-tests/SDL2 on my Raspberry Pi running 64-bit Raspberry Pi OS.

On my VM Ubuntu I found it in /usr/lib/x86-64-linux-gnu/installed-tests/SDL2

I did a bit of experimenting with a clean Raspberry Pi OS setup and then I installed libsdl2-dev and saw the installed-tests/SDL2 folder installed, so that’s what you need. So install the dev files as per New tutorial on installing SDL on Linux.

Plug in a gamepad and on your Pi, cd into that folder (the Pi one not the Ubuntu one!)  and in a terminal run ./controllermap

USB Joypad

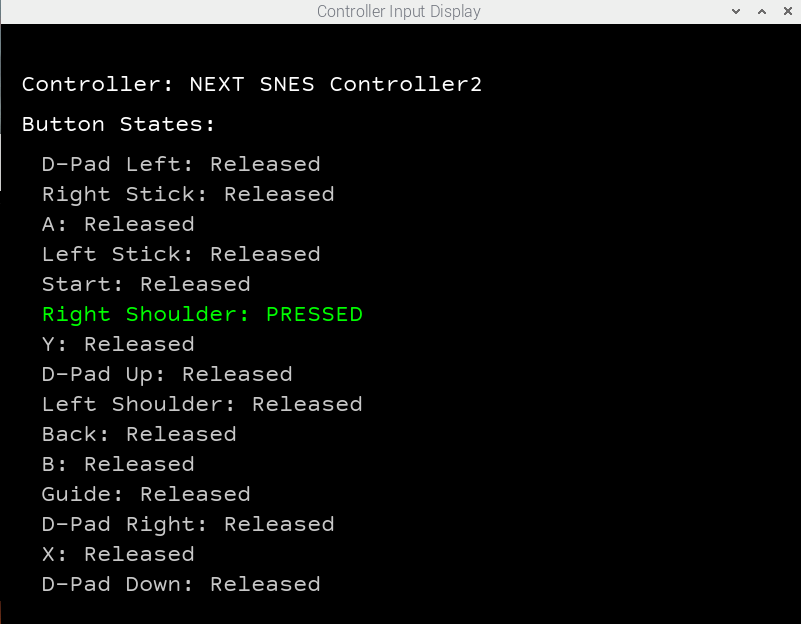
It will open with your B button highlighted. Press your B button. In the picture above it’s the circle on the right hand side that is the lowest of the four or the yellow button in this picture of my controller.

It will then go through every possible button.  Just press the corresponding button or space key if you haven’t got that. Compared to the main picture, mine lacks the two bottom joysticks, the buttons between the Stop and Start buttons and the two trigger buttons at the top. For each of those just press the space bar.  Eventually it will loop back to the B button. Just press it and it will finish and output the gamepad control map.

It outputs two copies of this. You can send one to a text file in your home folder by doing

./controllermap >~/gamepad.txt 

but you will have to press all the buttons etc. again. This is what my Pi gave.

030000001008000001e5000010010000,usb gamepad,platform:Linux,a:b2,b:b1,x:b3,y:b0,back:b8,start:b9,leftshoulder:b4,rightshoulder:b5,leftx:a0,lefty:a1,

And that is what you use in SDL2 code.


A very useful Windows Utility in C

A very useful Windows Utility in C

ExplorerPatcher menuIf you use Windows 11 you’ll be aware of one or two issues with it; the file explorer popup menu needs a second click to take you to the Windows 10 menu with Copy, cut paste etc.

So I was pleased to discover explorer patcher which is a utility written in C that lets you get the Windows 10 right-click menu back as well as changing the File explorer right-click popup menu and a lot of other stuff.

It’s on GitHub and the authors are happy for you to look at the source code and submit improvements of your own.

If you want to see how to make changes to Windows etc in C, this is a great example.

Added to the C Code Links page.

PS. I use this and have found that after a Windows update, the right-click menu gets reset to the Windows 11. However just opening the explorer patcher settings and unticking then ticking the option for Disable the Windows 11 context menu on the File Explorer menu fixes it.

Mle – a small text editor in under 10,000 lines of code

Mle – a small text editor in under 10,000 lines of code

Mie text editorIf you’re into C, one of the most interesting applications you can write is a text editor. It demands ability to use pointers for storing the text efficiently and command handling and doing things like searching, handling Unicode.

It can be equally instructive reading code someone else has written and this case Mle, is a text editor in less than 10,000 lines of C. It’s also cross-platform apparently, though you’ll have to build it on the relevant platform.

It uses three other open source libraries, linked at the foot of the main page. They are uthash, termbox2 and PCRE2.

Everything and fsearch

Everything and fsearch

Everything File SearchI’m currently operating on a Linux laptop as the M2 SSD on my new desktop PC decided to stop working the other day.  But I thought I’d mention a couple of utilities that I’ve recently started using.

My new PC, just three months old when working has a 1TB M2 SSD with Windows on it. Most software is installed here. All the data, backups, everything else is stored on a 10 TB Hard disk. This is my 10th PC since 1989 so it has the name PC10. Yes, original I know.

I have been copying everything I’ve created and written since 1989 and like a snowball rolling down a hill it has grown. When I finished copying everything from my old PC; a process that took a large chunk of four days, I’d used 2.3 TB out of the 10 TB hard disk.   I just copied across the Gigabit network connection and it maxxed out at 113 MB/S. That’s even with anti-virus running. Of course Windows has an overhead so sometimes the transfer speed drops down to KB/S for small files. I worked it out that over the 48 hours (4 days- 12 hours a day), it copied at 13 MB/S average.

In future it might make sense to zip up folders with small files in them. In the meantime I need to do a bit of pruning of files, removing duplicates etc.

Everything

I’d been looking for a utility to let me find files quickly and somebody had suggested Everything. It’s brilliant. It tells me that I have just over 4 million files. I can filter on document types, images, music files or just search on matching names. And it is very very fast. If you want to find the massive file that’s eating up disk space or duplicates, it does it. But it’s only for Windows. Lacking a Windows system at the mo, I’ve just borrowed the image from the Everything home page.

Fsearch

FSearch window

Developer Christian Boxdörfer also liked Everything and decided to create a Unix clone of it which is FSearch. And it’s written in C. That’s it on the left.

I set it to find all C files and sorted by size.


A mini-project- SDL toolkit

A mini-project- SDL toolkit

Coloured Rectangles
Image by Gerd Altmann from Pixabay

I’ve thought about doing this for a while. Build a small toolkit (a library) of helper routines for any program that uses the SDL2 library. That means it will have functions to do the following:

  1. Draw horizontal and vertical lines in a specified colour.
  2. Draw coloured rectangles both filled in and empty.
  3. Draw Circles of specified radius and colour.
  4. Draw hexagons in either orientation and of a specified size, hollow or filled.

Plus any other things that occur to me. I’ll start on this shortly.

SDL-TTF now on Raspberry Pi

SDL-TTF now on Raspberry Pi

Raspberry Pi screenshotI eventually got the Windows SDL vs TTF comparison program converted to run on Raspberry-pi, after wrestling with VS Code’s Folder. Get it wrong and you can waste hours trying to get it to compile and link. I originally set the Folder (VS Code’s way of managing projects) to the pi/Projects folder (which contained both asteroids and sdlttf folders) but eventually I sussed it and set sdlttf as my Folder.  The login user is pi and so the pi folder is my home folder. I created the Projects folder under it.

This time the home brewed print routine (print) took 28x as long as the SDL_ttf compared to 14x on Windows. I used the same text.png and font.ttf files. The times are in the Window caption and read (for those with poor contrast) sdl: 35538.574 ttf: 1235.630. These times are the microsecond times to draw the strings 100x.

Changes were fairly minimal. I changed the fopen_s to fopen (used for error logging and changed the paths to the two font files. The other change was in the timing which used the Linux versions of hr_time.h/.c and called the diff() function instead of GetElapsedTime().

I’ve zipped up the source file (sdlttf.c) plus timing files and JSON config files for VS Code in the sdlttf_pi.zip file and put it in the LearnConLinux repository on GitHub.

Note I created a projects folder then sdlttf under that. The paths in tasks.json reflect this. To build this you’ll need libsdl2-dev,libsdl2_image_dev and libsdl2-ttf-dev installed. I used clang version 7 (the default installed on pi when you do sudo apt install clang) but I imagine gcc should also build it without any problems.

This matches my conclusions from running the virtually identical Windows version. The sdlttf way is way faster for prerendered strings than my print routine which just blits the characters out of the font bitmap one by one.


How to create an Alphabet bitmap in CSharp

How to create an Alphabet bitmap in CSharp

Letters generated by the programHere’s another short utility. I have been looking for a decent alphabet to look in my next game (called HogWash) . As before, I want to create a sprite sheet with letters. But every alphabet set that I found had issues with kerning. I kid you not, usually but not always with M, W, or even Q.

Even when I put together a sprite sheet manually, the editor didn’t quite get it right and letters didn’t quite fit the grid. So to simplify it, here;’s a 50 line C# program that takes the letters you supply in a string, combined with a font (Liberation Mono- from Red Hat) and a brush (black solid). It does a double loop that I exit with a goto (shock horror!) when it reaches the a terminating * in the string I supplied.

That is the graphic file above that the program below generated. As you can see the letters are far enough apart so no overlapping. Just put in your path where I have for the source and dest consts. You can use this technique for building sprite sheet.

// Author D. Bolton Learncgames.com You are free to use and copy this program as you wish but please leave this line in.
using System;
using System.Drawing;
using System.Drawing.Imaging;

namespace buildfont
{
    class Program
    {
        const int LetterWidth = 100;
        const int LetterHeight = 120;
        const string source = "Your path"
        const string dest = @"YourPath\letters.png";

        static Bitmap allLetters = new Bitmap(LetterWidth * 8,LetterHeight * 5);

        static void Main(string[] args)
        {
            BuildOneImage();
        }

        private static void BuildOneImage()
        {
            var font = new Font("Liberation Mono",95);
            var brush = new SolidBrush(Color.Black);
            var str = "ABCDEFGHIJKLMNOPQRSTUVWXYZ*";
            Console.WriteLine("Creating letters.png");
            var aty = 0.0f;
            using (Graphics g = Graphics.FromImage(allLetters))
            {
                var strindex = 0;
                for (var y = 0; y < 5; y++)
                {
                    var atx = 0.0f;
                    for (int x = 0; x < 6; x++)
                    {
                        string aLetter = str[strindex++].ToString();
                        if (aLetter == "*") goto Done;
                        g.DrawString(aLetter, font, brush, atx, aty);
                        atx += LetterWidth;
                    }
                    aty += LetterHeight;
                }
            }
            Done:
            allLetters.Save(dest, ImageFormat.Png);
        }
    }
}
How to create a big image from a number of smaller ones

How to create a big image from a number of smaller ones

Card DeckAfter the day before yesterday’s experiment showed that loading a single larger image on an Android phone is nearly three times faster than loading 52 smaller images, I decided to write a short utility program to read all the 52 individual card files and create one file with them laid out neatly in four rows of cards, one row per suite with each card running from Ace to King.

The individual card .png files were all in one folder with two letter filenames rank and suit in capitals like AS.png (Ace of spades), TH.png (Ten of Hearts and so on).

This 62 line C# program reads all 52 files into RAM in a two-dimension array cards (original name eh!) in the method LoadAllImages() then in BuildOneImage() it writes them out in the four rows into the bitmap allcards then saves them out as one .png format file.

C# makes doing this very easy. In C you would have to write your own file format handling code or use a library like libpng.

// Author D. Bolton Learncgames.com You are free to use and copy this program as you wish but please leave this line in.
using System;
using System.Drawing;
using System.Drawing.Imaging;

namespace mpics
{
    class Program
    {
        const int CardWidth = 100;
        const int CardHeight = 153;
        const string source = "your path here"; // Path to all 52 card files
        const string dest = "target file here"; // Path + filename for target .png file.
        const string suits = "HCDS";
        const string ranks = "A23456789TJQK";

        static Bitmap[,] cards = new Bitmap[13,4];
        static Bitmap allcards = new Bitmap(CardWidth * 13,CardHeight * 4);

        static void Main(string[] args)
        {
            LoadAllImages();
            BuildOneImage();
        }

        private static void BuildOneImage()
        {
            Console.WriteLine();
            var aty = 0.0f;
            using (Graphics g = Graphics.FromImage(allcards))
            {
                for (var y = 0; y < 4; y++)
                {
                    var atx = 0.0f;
                    for (int x = 0; x < 13; x++)
                    {
                        var r = new Rectangle((int)atx, (int)aty, CardWidth, CardHeight);
                        g.DrawImage(cards[x,y],r);
                        atx += CardWidth;
                    }
                    aty += CardHeight;
                }
            }
            allcards.Save(dest, ImageFormat.Png);
        }

        private static void LoadAllImages()
        {
            var i = 0;
            foreach (char c in suits)
            {
                var j = 0;
                foreach (char r in ranks)
                {
                    var s = source + r + c+".png";
                    cards[j++,i] = (Bitmap)Bitmap.FromFile(s);
                }
                i++;
            }
        }
    }
}

Don’t forget to set the source and dest path constants. This was compiled in Visual Studio 2019 and run on Windows 10. The only really important thing I found was using the Rectangle r in BuildOneImage(). If I used just atx and aty and didn’t specify the size of card then DrawImage() drew much smaller images into the bitmap. I’m not sure why as the card images when loaded from disk were 100 wide by 153 deep, the same as specified in the constants CardWidth and CardHeight.

The card images were originally downloaded from the American Contract Bridge League but were much bigger so I scaled them first to 100 x 153 pixels. There are many free playing card images on the web but these are one of the nicer sets.