Category: Techniques

Great mystery #1 solved!

Great mystery #1 solved!

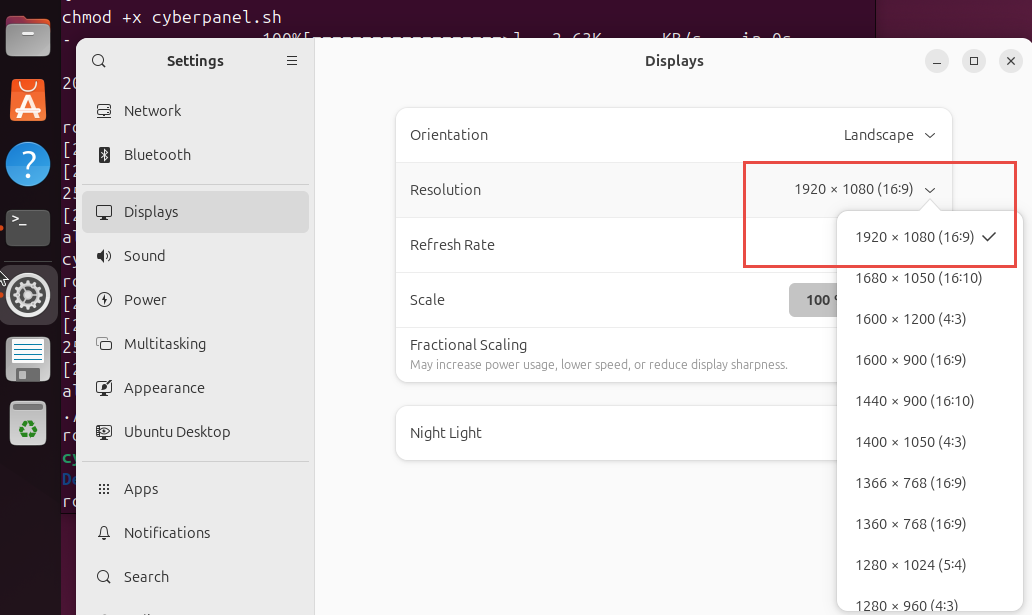
It was kind of silly. I installed Debian 13 in hyper-V, just to see how different it is from Ubuntu.  Like Ubuntu, it starts in a default size. I looked in the settings and there was a Displays there so I tried it and got the screen resized to full screen size.

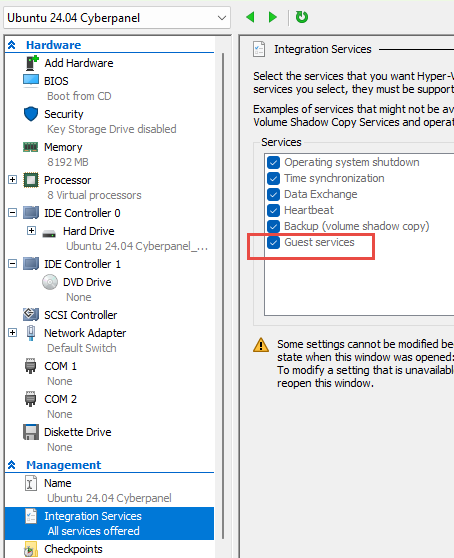
So I then went back to Ubuntu and tried that, and it worked. I believe that what helped was having guest services ticked in the Hyper-v settings.

Hyper-V settings Display settings in Ubuntu

Ever do a sudo apt update on your Raspberry Pi?

Ever do a sudo apt update on your Raspberry Pi?

sudo apt update error message


And you get this error message?  It says

E: Release file for http://archive.raspberrypi.com/debian/dists/bookworm/InRelease is not valid yet 
(invalid for another 10h 37min 50s). Updates for this repository will not be applied.
E: Release file for http://deb.debian.org/debian/dists/bookworm-updates/InRelease is not valid yet 
(invalid for another 12h 15min 47s). Updates for this repository will not be applied.

If you do

sudo hwclock -s

It will fix it. Apparently it’s to do with the hardware clock having drifted and I’m guessing this causes an error condition. Still, its an easy fix!


Setting up SDL3 on Linux

Setting up SDL3 on Linux

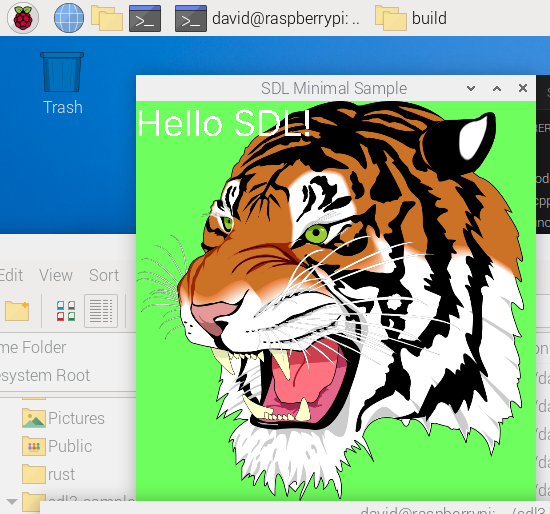
SDL3 program running on Raspberry Pi.

I knew it wasn’t going to be easy, but it turned out to be quite a bit more difficult than I thought.

The problem is, unlike SDL2, there are no dev versions of SDL3 etc. yet, so you have to build it from scratch.

I’ll be honest, I’m not sure I could have done it without this GitHub repository. User Ravbug who is very busy person (752 contributions on GitHub in the last year- I tip my hat to him or her!) who provided that repository.

It sets up SDL3, SDL_image, sdl_mixer and SDL_ttf.

Follow his link to the Wiki page Scroll down to the bottom for the Linux instructions. I can confirm that it works on Raspberry Pi as well.  You’ll need to install cmake first with

sudo apt install cmake

Then run his cmake to build everything and go for a coffee.
Now go into the build folder under sdl3-sample and do

make

That only takes a second or so.

After you’ve done that you’ll end up with a load of files including an executable sdl-min that you can run. That’s what generated the Tiger’s head – it plays The Sting film’s theme (The Entertainer) music as well demonstrating that it’s using SDL_mixer as well as SDL3 and SDL_ttf (I’m guessing) and of course SDL_image.

But that is just the start

To use SDL3 etc in your C program, you need a bit more configuration than with SDL2. I’m in uncharted waters here but used an AI- Claude 4 to help me get through and it did.

The problem is you have to tell VS Code where the header files are located, the .so files and also the executable needs to know at runtime.

I set up Ravbug’s sdl3_sample in my home folder so all paths start /home/david/sdl3-sample. 

This is my tasks.json


{
    "version": "2.0.0",
    "tasks": [
        {
            "type": "shell",
            "label": "clang-14.0 build active file",
            "command": "/usr/bin/clang-14",
            "args": [
                "-I/home/david/sdl3-sample/SDL/include",
                "-I/home/david/sdl3-sample/SDL_image/include", 
                "-I/home/david/sdl3-sample/SDL_mixer/include",
                "-I/home/david/sdl3-sample/SDL_ttf/include",
                "-g",
                "${file}","${workspaceFolder}/hr_time.c",
                "-L/home/david/sdl3-sample/build",	
                "-Wl,-rpath,/home/david/sdl3-sample/build",				
                "-o",
                "${fileDirname}/${fileBasenameNoExtension}",
                "-lSDL3",
                "-lSDL3_image", 
                "-lSDL3_ttf"   

            ],
            "options": {
                "cwd": "/usr/bin"
            },
            "group": {
                "kind": "build",
                "isDefault": true
            }
        }
    ]
}

The lines that are SDL3 specific include the -I’s to provide the include path. -L the path to the .so files and the -rpath line is the path to the runtime files which gets linked into the executable.

If you add these three lines into c_cpp_properties.json then you’ll also avoid the dreaded red squiggles.

            "includePath": [
                "${workspaceFolder}/**",
                "/home/david/sdl3-sample/SDL/include",
                "/home/david/sdl3-sample/SDL_image/include",
                "/home/david/sdl3-sample/SDL_ttf/include"
            ],

And your C’s #includes need the files prefixed like this :

#include <SDL3/SDL.h>
#include <SDL3_image/SDL_image.h>
#include <SDL3_ttf/SDL_ttf.h>

And here it is running on my Pi.

Missile Command running on a Raspberry Pi 5 with SDL3

Converting from SDL2 to SDL3 on Windows

Converting from SDL2 to SDL3 on Windows

Missile Command running with SDL3

These notes were made when converting an existing C game that used SDL2 to SDL3 on Windows. The game was originally developed for Linux Format and I had got it running on Windows with SDL2.

Windows include paths have been made consistent with Linux. The include files path for SDL3 need to be SDL3\… when setting them up. For SDL2, I had them in a folder c:\SDL2\include but noted that in SDL2.h include files were like this:

#include "SDL_main.h"
#include "SDL_stdinc.h"

While in SDL3’s SDL.h they are

#include <SDL3/SDL_stdinc.h>
#include <SDL3/SDL_assert.h>

So I put them c:\SDL3\SDL3

When you include them in your software they are like this:

#include <SDL3/SDL.h>
#include <SDL3/SDL_image.h>

Which is how they are in Linux.

The rest of these notes are taken from the differences between the SDL2 and SDL3 versions of the game. They are not complete but intended to give you an idea of some of the changes you may need to do.

SDL_TTF

TTF_RenderUTF8_Blended( is now TTF_RenderText_Blended with an extra text length parameter.

SDL_Rects are mostly replaced by SDL_FRect

This is a big change. Everywhere I was passing in an SDL_Rect became an SDL_Frect which is four floats rather than four ints.

SDL_RenderCopy is now SDL_RenderTexture and the last two params are now SDL_FRects.

To fix this I used a load of (float) casts.

SDL_RenderDrawLine becomes SDL_RenderLine and has an SDL_FRect parameter instaed of SDL_Rect.

Same for SDL_RenderDrawPoint which becomes SDL_RenderPoint.

SDL_GetMouseState keeps the same name but returns float * for both parameters now.

Setup changes slightly

There’s no SDL_SetMainReady() and SDL2main.lib is gone.

Also gone is SDL_INIT_EVERYTHING in SDL_Init()– you have to or the specific subunits. E.g. SDL_INIT_VIDEO | SDL_INIT_EVENTS

Also there’s no SDL_RENDERER_PRESENTVSYNC for SDL_CreateRenderer. Vsync is disabled by default as I found when my game ran about 30x faster and finished in a few seconds! Instead you need to call SDL_SetRenderVSync(renderer, 1) where 1 is syncing with each retrace, or 2 with every 2nd retrace.

Several of the events have been renamed, so SDL_KEYDOWN becomes SDL_EVENT_KEY_DOWN, SDL_MOUSEBUTTONDOWN becomes  SDL_EVENT_MOUSE_BUTTON_DOWN and similar for other events.  Also event.key.keysym.sym becomes event.key.key.

Finally SDL_FreeSurface( becomes SDL_DestroySurface.

I’m sure there are more but changing these was sufficent to get my game compiling and running correctly with SDL3.

Bit of a curiosity – Rust runs slower on Windows than Linux

Bit of a curiosity – Rust runs slower on Windows than Linux

And it is a fair comparison because the Linux I’m running (Ubuntu 24.04 LTS) runs on my Windows 11 box in a hyper-V VM. I wrote a Poker hand evaluation program which loaded a text file containing lines of seven playing cards in text format TS 2C 4D sort of thing. It was seven cards because there’s two in your hand and five on the table.

There were 1,000 lines of these and the program loaded the file into memory, holding the cards in a Vec<Vec<Card>>. Then it loops through the 1,000 elements and figures out the best hand for each set.  The bit that was timed was the loop not the loading the file into memory.

The source file is on GitHub. It has the project files plus some test cards. You can try it yourself. Note at the bottom of this article is a link to a much faster version.

https://github.com/David-H-Bolton/Projects/blob/main/rust_pokerhand.zip

On my PC, the Windows one average time per hand is 768 ns. On Ubuntu is 540ns. Mad eh! The same program runs in 70% of the time on Linux compared to Windows. Both are run with this command from a terminal/command line.

cargo run --release 1000_card_hads.txt

You can also try the test_card_hands.txt but you need to enable the show_cards feature. That shows the cards but doesn’t do timing. The default is do the timing but don’t show the cards or the evaluation.

cargo run --release --features show_card test_card_hands.txt

Shows the Rust program with the feature


The test cards say what each hand is and the output at the bottom is the program working out each hand.
The file

https://github.com/David-H-Bolton/Projects/blob/main/rust_pokerhand_faster.zip

contains a much faster version. On Linux it takes about 127 ns per hand. On Windows it’s about 190 ns.

Rust’s way of importing from other modules is bizarre

Rust’s way of importing from other modules is bizarre

I come from a background of Pascal and Delphi. From about 1989 Turbo Pascal 4 and subsequently Delphi had a really useful unit system for breaking a program down into multiple source files. A unit is the equivalent of Rust’s mod.  Anything you wish to export from a unit is put in the interface section of the source file- consts, types, functions etc. Like making them pub in Rust. Then in the source file that wants to use these, you just put using name-of-unit. No hassles, very easy to use and it just works.

Now in Rust, they have a cockermanie system.  I had a main.rs that had several Structs (Card and Game) and decided to put it in another file poker.rs inside a mod poker {.

I made both Structs pub.  When compiling, there’s no errors in poker.rs but in the main.rs which has

pub mod poker;
use poker::{Card, Game};

There’s red lines under Card and Game.

note: struct `crate::poker::poker::Card` exists but is inaccessible etc. Grrr.

Rust compile errors


Now, no doubt there is soime way to make this work but why make it so difficult?

Rust – Sometimes you don’t need to use HashMap or HashSet

Rust – Sometimes you don’t need to use HashMap or HashSet

Seven playing cardsI wrote a Poker Hand evaluator. It read in a file of a 1,000 randomly generated sets of seven cards like this AC 8H JC …and figured out what was the best hand. It’s in Rust and on GitHub. That takes you to a projects folder and the whole rust project complete with two test sets of cards are included. Look for the file Rust_pokerhand.zip.

Now in the Hand evaluation I used both a HashMap and HashSet.  Here for example is the code to count how many of each Rank there are.

    let mut rank_counts = HashMap::new();
    for card in cards.iter() {
        *rank_counts.entry(card.rank).or_insert(0) += 1;
    }

The program reads in the cards into a Vec<Vec<Card>> and then calculate the average time to evaluate a hand.

Now there’s nothing wrong with the program. One of the card sets is called test_card_hands.txt and has an instance of each hand type along with a comment.

5H AS 2D 6C 3S KD 7C - High card
7H 3D 8S 7C 4H 9H JC - One Pair
AD 7H 8C AC 5S 8D KS - Two Pairs

You can run that with this command:

cargo run --release --features "show_cards" test_card_hands.txt

Or if you run the other test set with this, it doesn’t show the cards but does calculate the average time.

cargo run --release 1000_card_hands.txt

If I run this on Windows it evaluates a hand in 780 ns on average and on Ubuntu 24.04 on the same PC, (running under Hyper-V), it’s faster typically 550 ns.

So, I was looking for ways to speed it up and thought.  The HasmMap and HashSets are running on small numbers of Cards. 13 for Ranks and 4 for suits so what if I use them as arrays. Would it be faster?

It was, roughly four times faster.

As an example, the code above I replaced with this:

    let mut rank_counts = [0,0,0,0,0,0,0,0,0,0,0,0,0];
    for card in cards.iter() {
       rank_counts[&card.rank.value()-2] += 1;
    }

That needed a value() method that mapped all the Ranks starting at 2, onto 2-14.

I also redid the code for working out a straight.

The original is this, plus a bit more to check for A2345:

    let mut values: HashSet<u8> = cards.iter().map(|card| card.rank.value()).collect();
    let mut unique_values: Vec<u8> = values.drain().collect();
    unique_values.sort_unstable();

    let mut straight_length = 1;
    for i in 1..unique_values.len() {
        if unique_values[i] == unique_values[i - 1] + 1 {
            straight_length += 1;
            if straight_length == 5 {
                is_straight = true;
                break;
            }
        } else {
            straight_length = 1;
        }
    }
The improved version uses this constant

static STRAIGHTS: &'static [i32]=&[7936, 3968, 1984, 992, 496, 248, 124, 62, 31, 7681];

Plus a binvalue function which maps the card Ranks onto 1,2,4,8 etc. Just or the Cards binValues together and ‘ands’ (&) it with the individual STRAIGHTS values.

      let mut bivalue=0;
      for card in cards.iter() {
        bivalue |= card.rank.binvalue();
      }   

      for i in 0..STRAIGHTS.len(){
        if &binvalue & STRAIGHTS[i]== STRAIGHTS[i] {
            is_straight= true;
            break;
        }
    }
Debugging C# on Ubuntu and you get

Debugging C# on Ubuntu and you get

vs-debugger-popup

So you’re trying to debug C# code on Linux, maybe Ubuntu. You’ve installed .NET 6 or 7, you’ve built your solution in Visual Studio on your Windows PC, published it then copied the files over to the Linux box. But when you run it, you get an error “Unable to find debugger script at”. It’s time to debug your Linux app from your Windows Visual Studio.

Now there is a Microsoft support issue for this and it’s less than helpful. Read below to see how I fixed it.

Only, as soon as it tries to attach over SSH (with username, password, IP etc), you get this popup on the left. “Computer says no”.

Looking in the VS Output folder you see the text below or something similar. For whatever reason, it failed to create a hidden folder in your home folder. To fix this, all you have to do is create that folder. It’s .vs-debugger under your home folder.

If you’re not familiar with .folders on Linux, note that the . at the front of the name means it’s a hidden folder. A simple ls command will not reveal it. If you use the File Manager, you can click the settings in the top right and tick the Show Hidden Files. Then you can do a cd ~ followed by a mkdir .vs-debugger. And View in files to confirm that it’s there.

Now the only pain with debugging is that the application must be running for Visual Studio to attach to it. I was debugging a utility that is run, does its business and closes. So to debug it, I added this as the first line in main() in program.cs

Console.ReadKey();

So run it, let it sit waiting for a key then attach visual studio’s debugger to your app over SSH, add your breakpoints and hit a key. Simples!

New Linux Timing Code

New Linux Timing Code

silver and white round analog watch

For some time, I had a problem with my old Linux timing code. The units hr_time.h/c had to have the includes arranged in the right order and some flags set for it to compile. Plus it never seemed right having to do this in hr_time.h

#include <linux/time.h>
#define __timespec_defined 1
#define __itimerspec_defined 1
#define __timeval_defined 1

But today I found some better code on this SolarianProgrammer website and I’m always happy to give credit where it’s due. I’ve witched to using C17 which clang on Ubuntu (clang 14) and Raspberry Pi (clang 11) both seem to accept.

So now my hr_time.h looks like this:

hr_time.h

#pragma once
#include <stdlib.h>
#include <time.h>

void startTimer();
void stopTimer();
double diff();

hr_time.c

#include "hr_time.h"
#include <time.h>
#include <stdlib.h>
#include <stdio.h>

struct timespec start;
struct timespec end;

void startTimer() {
	if (timespec_get(&start, TIME_UTC) != TIME_UTC) {
		printf("Error in calling timespec_get\n");
		exit(EXIT_FAILURE);
	}
};

void stopTimer() {
	if (timespec_get(&end, TIME_UTC) != TIME_UTC) {
		printf("Error in calling timespec_get\n");
		exit(EXIT_FAILURE);
	}
};

double diff()
{
	return  (double)(end.tv_sec - start.tv_sec) + 
			((double)(end.tv_nsec - start.tv_nsec) / 1000000000L);
}

I’m only ever using one timer, if you want to modify this to pass in a timer in the startTimer and stopTimer then it’s easy enough.

A free eBook about the Game of Life

A free eBook about the Game of Life

Front cover of Conway's Game of Life eBook.Remember the cellular automation Life? I covered it in previous blog entries John Conway’s Game of Life and also Portable Life in C. Well, Associate Professor Nathaniel Johnston (in the Department of Mathematics and Computer Science at Mount Allison University in New Brunswick, Canada) and Dave Greene wrote a book/eBook about Life. It’s N. Johnston and D. Greene. Conway’s Game of Life: Mathematics and Construction.

The 474 page eBook is free on this page or you can buy the coloured hardback book. On Amazon that’s a modest £59.99! The PDF is 93 MB in size.

Ever since Life was publicized in Scientific American in the 1970s, it’s held a fascination for many including myself. I wrote a program (in Basic) 45 years ago to run it, but it was quite slow. One of the fastest I ever saw was written in 6502 assembly language running on an Acorn Atom. A very comprehensive and fast open source Life is Golly, written in C++ and is scriptable in Python or Lua.

But back to the book. If you are a real life afficionado and know the difference between a Glider and an Oscillator then this book/eBook is definitely for you. It’s a detailed look at Life from an academic point of view.