Category: raspberry-pi

Ever do a sudo apt update on your Raspberry Pi?

Ever do a sudo apt update on your Raspberry Pi?

sudo apt update error message


And you get this error message?  It says

E: Release file for http://archive.raspberrypi.com/debian/dists/bookworm/InRelease is not valid yet 
(invalid for another 10h 37min 50s). Updates for this repository will not be applied.
E: Release file for http://deb.debian.org/debian/dists/bookworm-updates/InRelease is not valid yet 
(invalid for another 12h 15min 47s). Updates for this repository will not be applied.

If you do

sudo hwclock -s

It will fix it. Apparently it’s to do with the hardware clock having drifted and I’m guessing this causes an error condition. Still, its an easy fix!


Setting up SDL3 on Linux

Setting up SDL3 on Linux

SDL3 program running on Raspberry Pi.

I knew it wasn’t going to be easy, but it turned out to be quite a bit more difficult than I thought.

The problem is, unlike SDL2, there are no dev versions of SDL3 etc. yet, so you have to build it from scratch.

I’ll be honest, I’m not sure I could have done it without this GitHub repository. User Ravbug who is very busy person (752 contributions on GitHub in the last year- I tip my hat to him or her!) who provided that repository.

It sets up SDL3, SDL_image, sdl_mixer and SDL_ttf.

Follow his link to the Wiki page Scroll down to the bottom for the Linux instructions. I can confirm that it works on Raspberry Pi as well.  You’ll need to install cmake first with

sudo apt install cmake

Then run his cmake to build everything and go for a coffee.
Now go into the build folder under sdl3-sample and do

make

That only takes a second or so.

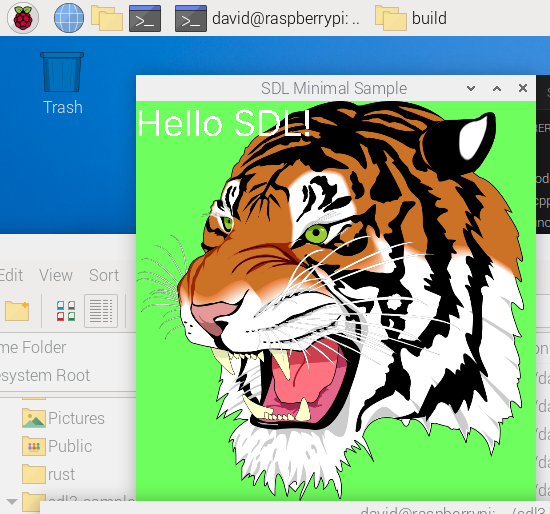
After you’ve done that you’ll end up with a load of files including an executable sdl-min that you can run. That’s what generated the Tiger’s head – it plays The Sting film’s theme (The Entertainer) music as well demonstrating that it’s using SDL_mixer as well as SDL3 and SDL_ttf (I’m guessing) and of course SDL_image.

But that is just the start

To use SDL3 etc in your C program, you need a bit more configuration than with SDL2. I’m in uncharted waters here but used an AI- Claude 4 to help me get through and it did.

The problem is you have to tell VS Code where the header files are located, the .so files and also the executable needs to know at runtime.

I set up Ravbug’s sdl3_sample in my home folder so all paths start /home/david/sdl3-sample. 

This is my tasks.json


{
    "version": "2.0.0",
    "tasks": [
        {
            "type": "shell",
            "label": "clang-14.0 build active file",
            "command": "/usr/bin/clang-14",
            "args": [
                "-I/home/david/sdl3-sample/SDL/include",
                "-I/home/david/sdl3-sample/SDL_image/include", 
                "-I/home/david/sdl3-sample/SDL_mixer/include",
                "-I/home/david/sdl3-sample/SDL_ttf/include",
                "-g",
                "${file}","${workspaceFolder}/hr_time.c",
                "-L/home/david/sdl3-sample/build",	
                "-Wl,-rpath,/home/david/sdl3-sample/build",				
                "-o",
                "${fileDirname}/${fileBasenameNoExtension}",
                "-lSDL3",
                "-lSDL3_image", 
                "-lSDL3_ttf"   

            ],
            "options": {
                "cwd": "/usr/bin"
            },
            "group": {
                "kind": "build",
                "isDefault": true
            }
        }
    ]
}

The lines that are SDL3 specific include the -I’s to provide the include path. -L the path to the .so files and the -rpath line is the path to the runtime files which gets linked into the executable.

If you add these three lines into c_cpp_properties.json then you’ll also avoid the dreaded red squiggles.

            "includePath": [
                "${workspaceFolder}/**",
                "/home/david/sdl3-sample/SDL/include",
                "/home/david/sdl3-sample/SDL_image/include",
                "/home/david/sdl3-sample/SDL_ttf/include"
            ],

And your C’s #includes need the files prefixed like this :

#include <SDL3/SDL.h>
#include <SDL3_image/SDL_image.h>
#include <SDL3_ttf/SDL_ttf.h>

And here it is running on my Pi.

Missile Command running on a Raspberry Pi 5 with SDL3

Interesting bug with controllermap

Interesting bug with controllermap

Running a Rust program to show gamepad controls

So I’ve been playing with a Rust program that uses the config string generated by controllermap. It shows all the keys and the text of a particular button turns green when you press it and it shows PRESSED/RELEASED.

But it got A and B buttons mixed up and also X and Y. I’d press A, it highlighted B etc.

I checked my code, it wasn’t there. I ran controllermap again and it generated a similar config string.

I then went back to the Pi version of Asteroids, put it on a Pi, started debugging it, pressed the fire button and it hit the line of code for the A button. D’oh.

The only conclusion I can come up with is that controllermap gets it wrong for my gamepad. I had somehow missed it when I added gamepad control for the Asteroid Pi.

It’s quite easy to fix.  This is what the full text in gamepad.txt look like.

030000001008000001e5000010010000,usb gamepad,platform:Linux,crc:417e,a:b2,b:b1,x:b3,y:b0,back:b8,start:b9,leftshoulder:b4,rightshoulder:b5,leftx:a0,lefty:a1,

but we’re only interesed in the button mappings for a,b, x and y which are in bold.

a:b2,b:b1,x:b3,y:b0,

Just swap the a b mappings and the x and y so it looks like

a:b1,b:b2,x:b0,y,b3

Then save the file and it now works correctly.


New tutorial posted – how to build controllermap in Linux

New tutorial posted – how to build controllermap in Linux

Controllermap utility

Remember controllermap? The utility that creates a configuration string for a game pad etc. I found that it is no longer installed by default when you install libsdl2-dev on Linux.  I found the hard way, trying to use it on my new Raspbverry Piu 5.

But the source code is available for it in the libsdl 2 releases.

So I wrote a quick tutorial that explains how to get the source code and build it using clang on VS Code on a Pi or any Linux box.  It’s linked here or you can find it on the tutorials menu.

How fast is a Raspberry Pi 5?

How fast is a Raspberry Pi 5?

Raspberry PI 5
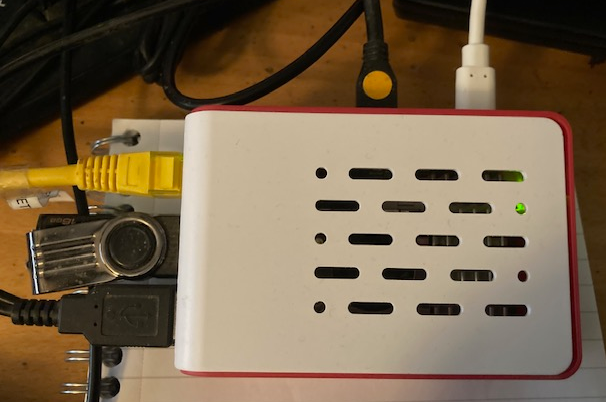
I recently bought one with 8 GB RAM pictured above. I haven’t got an SSD for it yet so am still pottering about with an SD Card.

I’ve installed VS Code, clang. and Rust along with the VS Code extensions Rust-Analyzer and codelldb.

Out of curiosity I compiled and ran a Rust program that reads in a text file of 1,000 lines of text with each line holding 7 random cards like this: AH 6D 2C 4S JD QH QC.

The idea is to load the file into RAM then process each line and determine the best poker hand.

On my PC 11th Gen Intel(R) Core(TM) i7-11700K @ 3.60GHz (which runs Windows 11), I compared running the Rust program in Windows 11, on Ubuntu 24.04 LTS running in a Hyper-V VM on the same PC and on the Raspberry Pi 5 using it’s own Debian (Bookworm) version.

Here are the times per hand.

  • Windows: 175 ns.
  • Ubuntu on Hyper-V 125 ns
  • Raspberry Pi 5: 175 ns.

You can download the project with the test cards from GitHub. This link is a zip file containing the project file.

To run it in release in VS Code, in the terminal type in

cargo run --release 1000_card_hands.txt
Timings running under Ubuntu


Or you can view the test cards which include the results with commemts in the test file. No need to run it release.

cargo run --features=show_cards test_card_hands.txt

Showing cards with test data

What is so suprising is that the time on Windows and Rapberry Pi 5 are the same. Windows is running a virus checker (Windows Defender) and I guess that might slow it a bit.

How to fix sound on the Raspberry Pi

How to fix sound on the Raspberry Pi

Raspi-config for Raspberry PiFirst I modded the code that inits sound to this:

	int success=Mix_OpenAudio(44000, AUDIO_F32LSB, 2, 8192);
	if (success==-1 ) {

		LogError2("InitSetup failed to init audio because %s",Mix_GetError());
	}

That extra call to Mix_GetError() returns a string saying what the problem is and in this case I got

ALSA : Couldn’t find any hardware audio formats.

ALSA is short for Advanced Linux Sound Architecture and Wikipedia is very informative. It certainly put some perspective on it.


Also I found this article adds a lot more information.  What fixed it though was doing

sudo raspi-config

Then pressing enter on 1. System Options and then S2 Audio and selecting the headphones option. Simple as that. After that asteroids played the sounds as expected.

There’s a lesson here which is to use the functions provided, in this case calling the Mix_GetError() function to show errors.  I added it into the PlayASound() call to see why it was failing, and it stopped doing it, i.e. it worked with lots of explosions on screen. I suspect it was the sound configuration hadn’t been properly set which is an issue with Raspberry Pis apparently.

Raspberry Pi Sound issues- trying to fix it

Raspberry Pi Sound issues- trying to fix it

Loudpeaker
Image by OpenClipart-Vectors from Pixabay

In working through my Linux/Raspberry Pi eBook(Yes – the second eBook!), I’m up to the chapter where sounds are introduced using the SDL_mixer library. And I’ve hit two sets of problems.

It sometimes refuses to initialize the sound code.  This code below hits the LogError line:

	int success=Mix_OpenAudio(22050, AUDIO_S16LSB, 2, 8192);
	if (success==-1 ) {
		LogError("InitSetup failed to init audio");
	}

The other day it was working but not today. Now I have updated the Pi’s code (sudo apt update etc) but I wouldn’t have expected that to break it. I’ve been looking on the internet and find the whole thing a bit complicated.

I’ve got my Pi running 64-bit Raspberry Pi OS. I’ve changed the output device to headphones which plug into the headphone socket. If I run the VLC media player and tell it to play into the headphones, it will happily play the .wav files I’ve got for the asteroids game.

But if I run speaker-test, a terminal application with this command line

speaker-test -c2 -twav -l7 plughw:1,0

I get

speaker-test 1.2.4

Playback device is default
Stream parameters are 48000Hz, S16_LE, 2 channels
WAV file(s)
Setting of hwparams failed: Invalid argument

By running this command:

aplay -L

I got 71 lines of output but of these these below are the most important

output
hw:CARD=Headphones,DEV=0
    bcm2835 Headphones, bcm2835 Headphones

and the speaker-test command using the device parameter –Dhw:Headphones now worked. I’ve highlighted the bits in the aplay output needed to identify the device.

The new command  is

speaker-test -c2 -twav -l7 -Dhw:Headphones

I can now hear a female voice saying front left then front right a few times in my headphones.

So my Pi’s sound device is working; I just have to figure why SDL_mixer isn’t always. I’ll keep looking.

And the second problem which only occurs when the mixer is working, is when you play a lot of sounds. The PlayASound() function checks the result. On Windows it never had a problem but on Raspberry Pi, when you blow up a lot of asteroids say at one time, it plays a number of explosions then returns an error for each explosion after that. I think there’s only so many channels; that’s an easy fix; just ignore the error and return as if it succeeded.

Networking fun with my Pi

Networking fun with my Pi

Networking
Image by Free-Photos from Pixabay

I lost my main internet for a week due to a power cut that left my main router in a funny state. It had to be factory reset then WiFi SSDs and passwords were reset. My office internet comes down a very long ethernet cable via two switches and a router. I had problems with my router and it got factory reset. Unfortunately I didn’t set this network up and didn’t realise that the network had two routers each doing DHCP and consequently it took a week to get things right. At one point I;d do a ping from my desktop PC and the answer would come back as IPV6, It was totally ignoring IPV4 requests, pings to domains with the -4 parameter were unreachable. Not a fun week.

My Pi which plugs into one of the switches and my desktop PC which also plugs onto the same switch would not talk. Both could see the internet but my Pi could not see Microsoft servers. I’d tried everything, even giving it a permanent IP rather than a DHCP but that can cause issues if the DHCP issues an IP address the same.

I do rather a lot with my PC and the Pi and having them networked is much more convenient than not. I use WinSCP for copying files and Putty if I need to connect in.

In the end, I bottled out and burnt the Raspberry Pi OS on a SD Card and booted from that. One hour later I’d installed all 295 updates and then installed VS Code.


Back on the Raspberry Pi

Back on the Raspberry Pi

Pi Asteroids DevelopmentIt has been a few months since I last used it and as you’d expect, it took a little bit of time and effort to get things back to what they were.

I’m pretty good about backing things up and it took about 30 minutes to burn a new SD Card, update it, install VS Code and the C/C++ extension, then copy my asteroids version over. I use WinSCP so had to enable SSH on the PI. It’s disabled by default but just tick a checkbox on the interface tab of the Preferences->Configuration menu.

Even then it didn’t compile. Of course I had to reinstall the dev versions of SDL, SDL_image, SDL_mixer and SDL_ttf and the clang compiler. Still it didn’t compile. I had created a Projects folder and created an Asteroids folder underneath that. I also had the Vs Code JSON files that you need for compiling C/C++. the main one of which is tasks.json. Those were in a folder .vscode which I had backed up but I’d copied it over into the wrong location. You want it located inside your VS Code folder.

This makes sense. If you have say five different projects then you are going to have a different build, link stuff per project. So you’ll have a unique .vscode in each folder. When you want to switch projects, you just close the Folder in the VS Code File menu and open it in the folder for the project that you next want to work on.

Mind you it still wouldn’t compile. It turned out my tasks.json has clang-6 in it. When I did a clang –version on it, it told me it was clang 7.0.1. So I upped it to clang-7 in tasks.json and that fixed it. It all compiled and ran.

Once you’ve done this a time or two it becomes 2nd nature but I can understand novices frustration; there are a lot of moving parts that all have to be right before you can even write and run C code. It’s not like other programming languages are really any better though. If you have setup virtual environments in Python and installed Python modules, you’ll know what it can be like.